Roy's Woodworking
Roy's Woodworking
Bending wood without steam can be a very successful method. Most people when you mention bending wood think of a steam box and steam. While this is an old and proven method, it is not the only method.
Bending wood without steam can be a very successful method. Most people when you mention bending wood think of a steam box and steam. While this is an old and proven method, it is not the only method.
LAMINATING WOOD TO BEND
LAMINATING WOOD TO BEND
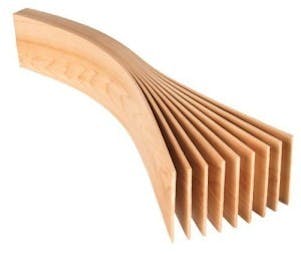
A very common practice today is laminating wood much the same as plywood is formed. This provides strength and makes the wood very pliable to work with. By taking solid wood and cutting it into thin strips glued together, will give you any curve you want. The tighter the curve, the thinner the strips must be cut.
To cold-bend wood, first, re-saw your stock into thin strips and plane it so the thickness is even. The thickness of the strips depends to a large extent on the radius of the curve. The tighter the radius, the thinner the strips. I use this chart as a jumping-off point:
BENDING WOOD WITHOUT STEAM
BENDING WOOD WITHOUT STEAM
Recommended Products:
Recommended Products:
Want More Plans?
Want More Plans?
Download over 16,000 plans for any project you can dream of!
Download over 16,000 plans for any project you can dream of!

The Ultimate $1000 Small Workshop:
The Ultimate $1000 Small Workshop:
Build a complete wood shop for under $1,000
Build a complete wood shop for under $1,000

Download More Shed Plans Below:
Download More Shed Plans Below:
Learn to build any shed in a weekend!
Learn to build any shed in a weekend!

• 2″ to 4″ radius — 3/32″ thick
• 4″ to 8″ radius — 1/8″ thick
• 8″ to 12″ radius — 3/16″ thick
• 12″ radius or larger — 1/4″ thick
• 2″ to 4″ radius — 3/32″ thick
• 4″ to 8″ radius — 1/8″ thick
• 8″ to 12″ radius — 3/16″ thick
• 12″ radius or larger — 1/4″ thick
The form can be made of MDF (medium density fibreboard) which is very strong and will hold the wood strips in precise form. Also when building the form, you must allow for spring back when the clamps are released.
The form can be made of MDF (medium density fibreboard) which is very strong and will hold the wood strips in precise form. Also when building the form, you must allow for spring back when the clamps are released.
GLUE UP
GLUE UP

Stack the strips as you will glue them together. If you use strips that were all re-sawn from the same board, flip every other strip end for end to reverse the grain slope.
Spread a thin layer of glue on the face of one strip, lay the next strip on top of it, spread more glue and repeat. If you’re laminating a large number of strips, you may want to choose an adhesive with an extended working time.
Once glued, position them around your mould to shape the arc. Start clamping from the centre outward using lots of clamps.
Allow the glue to dry for 24 hours before removing clamps and you should now have a perfect arc. You can now cut to length and run the desired profile you want.
Once glued, position them around your mould to shape the arc. Start clamping from the centre outward using lots of clamps.
Allow the glue to dry for 24 hours before removing clamps and you should now have a perfect arc. You can now cut to length and run the desired profile you want.
When the strips are glued up, they must be clamped around a form to create the arc you want.
When the strips are glued up, they must be clamped around a form to create the arc you want.
